



Bright Isn’t the Same as Harsh
“Everything in moderation.”
— Aristotle
One of the biggest mistakes beginner producers make is chasing brightness.
More treble.
More presence.
More air.
At first, everything sounds exciting.
Until…
The cymbals hurt your ears.
The vocal becomes painful.
The guitars become brittle.
The mix becomes exhausting to listen to.
The goal isn’t maximum brightness.
The goal is pleasant brightness.
Quick Summary
👉 Harshness usually lives in the High Mid (2–6 kHz) and High (6–12 kHz) frequency ranges. It can be reduced using EQ, dynamic EQ, de-essers, better microphone choices, and by balancing bright frequencies with healthy midrange instead of simply removing all the treble.
Download my Free Magic EQ Settings
One way I like to think about EQ is by dividing the audible spectrum into seven large regions.
Each one has its own personality.
1. Subharmonic (20–60 Hz)
The feeling more than the sound.
Responsible for:
- Sub bass
- Movie explosions
- Club systems
2. Low (60–250 Hz)
The weight.
Responsible for:
- Kick drum
- Bass guitar
- Warmth
3. Low Mid (250–500 Hz)
The body.
Too much creates:
4. Mid (500 Hz–2 kHz)
The definition.
Responsible for:
- Musical detail
- Instrument identity
- Clarity
5. High Mid (2–6 kHz)
The excitement.
Also…
The danger zone.
Too much creates:
- Harsh vocals
- Painful guitars
- Aggressive cymbals
- Listening fatigue
6. High (6–12 kHz)
The sparkle.
Responsible for:
- Air
- Presence
- Cymbal shimmer
- Vocal breath
Too much becomes:
7. Air (12–20 kHz)
The atmosphere.
Adds:
Often felt more than consciously heard.
How EQ Works: Types, Bands & Filters
Harshness usually lives between 2 kHz and 12 kHz.
Brightness isn’t the enemy.
Harshness is.
Think about a crash cymbal.
A great cymbal should sound:
Not:
If the listener turns the volume down…
You’ve gone too far.
EQ Explained Like Sculpting Stone 🗿
If it hurts your ears, it isn’t adding excitement anymore.
The easiest way to identify harshness is with an EQ.
Step 1
Create a bell filter.
Step 2
Use a fairly narrow Q.
Step 3
Boost several dB.
Step 4
Sweep across the frequency spectrum.
When the harshness suddenly jumps out…
You’ve found it.
Step 5
Instead of boosting…
Cut gently.
Usually:
is enough.
Find it first. Cut it second.
Your Q controls how wide the EQ affects the signal.
Narrow Q
Great for:
- Ringing frequencies
- Resonances
- Whistles
Wide Q
Better for:
- Overall tone
- Smooth shaping
- Natural sounding EQ
Think of it like using sandpaper.
Sometimes you need precision.
Sometimes you need broad smoothing.
Traditional EQ always cuts.
Even when the harshness isn’t there.
Dynamic EQ only cuts when needed.
That means:
- Bright parts stay bright.
- Harsh moments get controlled.
- The mix stays alive.
It’s one of the biggest advances in digital mixing.
One of the world’s best EQ plugins.
Its Dynamic EQ mode allows individual bands to become dynamic.
Perfect for controlling harsh vocals and cymbals.
Gullfoss doesn’t just remove harshness.
It continuously balances the entire frequency spectrum.
Think of it as an intelligent tonal optimizer.
Probably the most famous harshness reduction plugin.
It automatically finds harsh resonances and reduces them in real time.
It’s almost like an intelligent de-harshing assistant.
One of the best free Dynamic EQ plugins available.
Perfect for:
- Learning Dynamic EQ
- Budget studios
- Professional work
Dynamic EQ removes harshness only when it actually exists.
⭐️ Download my Free Music Production Guides or take my free Ableton Live Course ⭐️
A de-esser is really just a specialized compressor.
Instead of compressing the whole signal…
It compresses only harsh high frequencies.
Usually:
sounds.
Common vocal ranges:
5–8 kHz
But de-essers aren’t only for vocals.
They’re also useful on:
- Hi-hats
- Overheads
- Tambourines
- Bright guitars
Think of a de-esser as a safety valve.
It waits quietly…
Then jumps in only when things get too sharp.
Demystifying the De-Esser: Taming Harsh Sibilance with Precision
This is where many beginners go wrong.
They successfully remove the harshness…
But now the mix sounds:
- Dull
- Lifeless
- Blanket-covered
The goal isn’t less treble.
The goal is better treble.
Often you’ll reduce one harsh frequency…
Then gently boost a smoother area above it.
The result:
Replace bad brightness with good brightness.
If you remove lots of high frequencies…
You may also remove the instrument’s ability to cut through the mix.
For example:
A hi-hat doesn’t only exist in the highs.
Its stick attack often lives in the midrange.
Likewise:
- Acoustic guitars
- Vocals
- Cymbals
- Percussion
All rely on healthy mids to remain audible.
Sometimes adding a little presence in the mids allows you to reduce harsh highs without losing clarity.
The easiest harshness to fix…
Is the harshness you never record.
Match the Microphone to the Source
A bright instrument often sounds better through a darker microphone.
Examples:
Banjo
Instead of a bright condenser…
Try a darker dynamic microphone.
Open Hi-Hat
A condenser can exaggerate the harshness.
Many engineers get fantastic results with:
- Shure SM7B
- Electro-Voice RE20
- AKG D112
These microphones naturally smooth the upper frequencies.
Nasal Vocals
If a voice already has lots of upper-mid energy…
A smoother microphone often produces a more balanced recording than a bright condenser.
Bright source + bright microphone = even brighter.
Bright source + darker microphone = balance.
A Shure SM7B easily tames the harshness of an open hi-hat all day.
Its naturally smooth top end makes it one of my favorite unconventional hi-hat microphones.
Sometimes the best EQ…
Is choosing the right microphone.
Every instrument sits somewhere between two extremes.
Too dark…
And it disappears.
Too bright…
And it becomes painful.
Your job isn’t choosing one side.
It’s finding the balance.
Think of the top end like sunlight.
Too little…
Everything feels dull.
Too much…
You get sunburn.
The perfect amount makes everything look beautiful.
Treble works exactly the same way.
Q: Which frequencies sound harsh?
A: Most harshness occurs between about 2 kHz and 12 kHz, particularly in the High Mid and High frequency bands.
Q: Should I cut or boost harsh frequencies?
A: Usually it’s better to make small cuts at the offending frequency rather than boosting elsewhere to compensate.
Q: What’s better: EQ or Dynamic EQ?
A: Static EQ is excellent for permanent problems. Dynamic EQ is better for harshness that only appears occasionally.
Q: Is Gullfoss or Soothe worth the price?
A: If you regularly mix vocals, cymbals, acoustic guitars, or bright instruments, it’s one of the most effective tools available for reducing harshness naturally.
Q: Can microphone choice reduce harshness?
A: Absolutely. A darker microphone can produce a much smoother recording than trying to fix an overly bright recording later with EQ.
Dynamic EQ: Taming Resonant Frequencies in Your Audio Tracks
Harshness isn’t caused by having too much treble.
It’s caused by having the wrong treble.
Good treble sounds:
Bad treble sounds:
EQ can help.
Dynamic EQ can help even more.
A de-esser protects your listeners.
And the right microphone may solve the problem before you ever press Record.
Don’t chase brighter.
Chase smoother.
Because the best mixes don’t make people reach for the volume knob.
They make people turn it up.
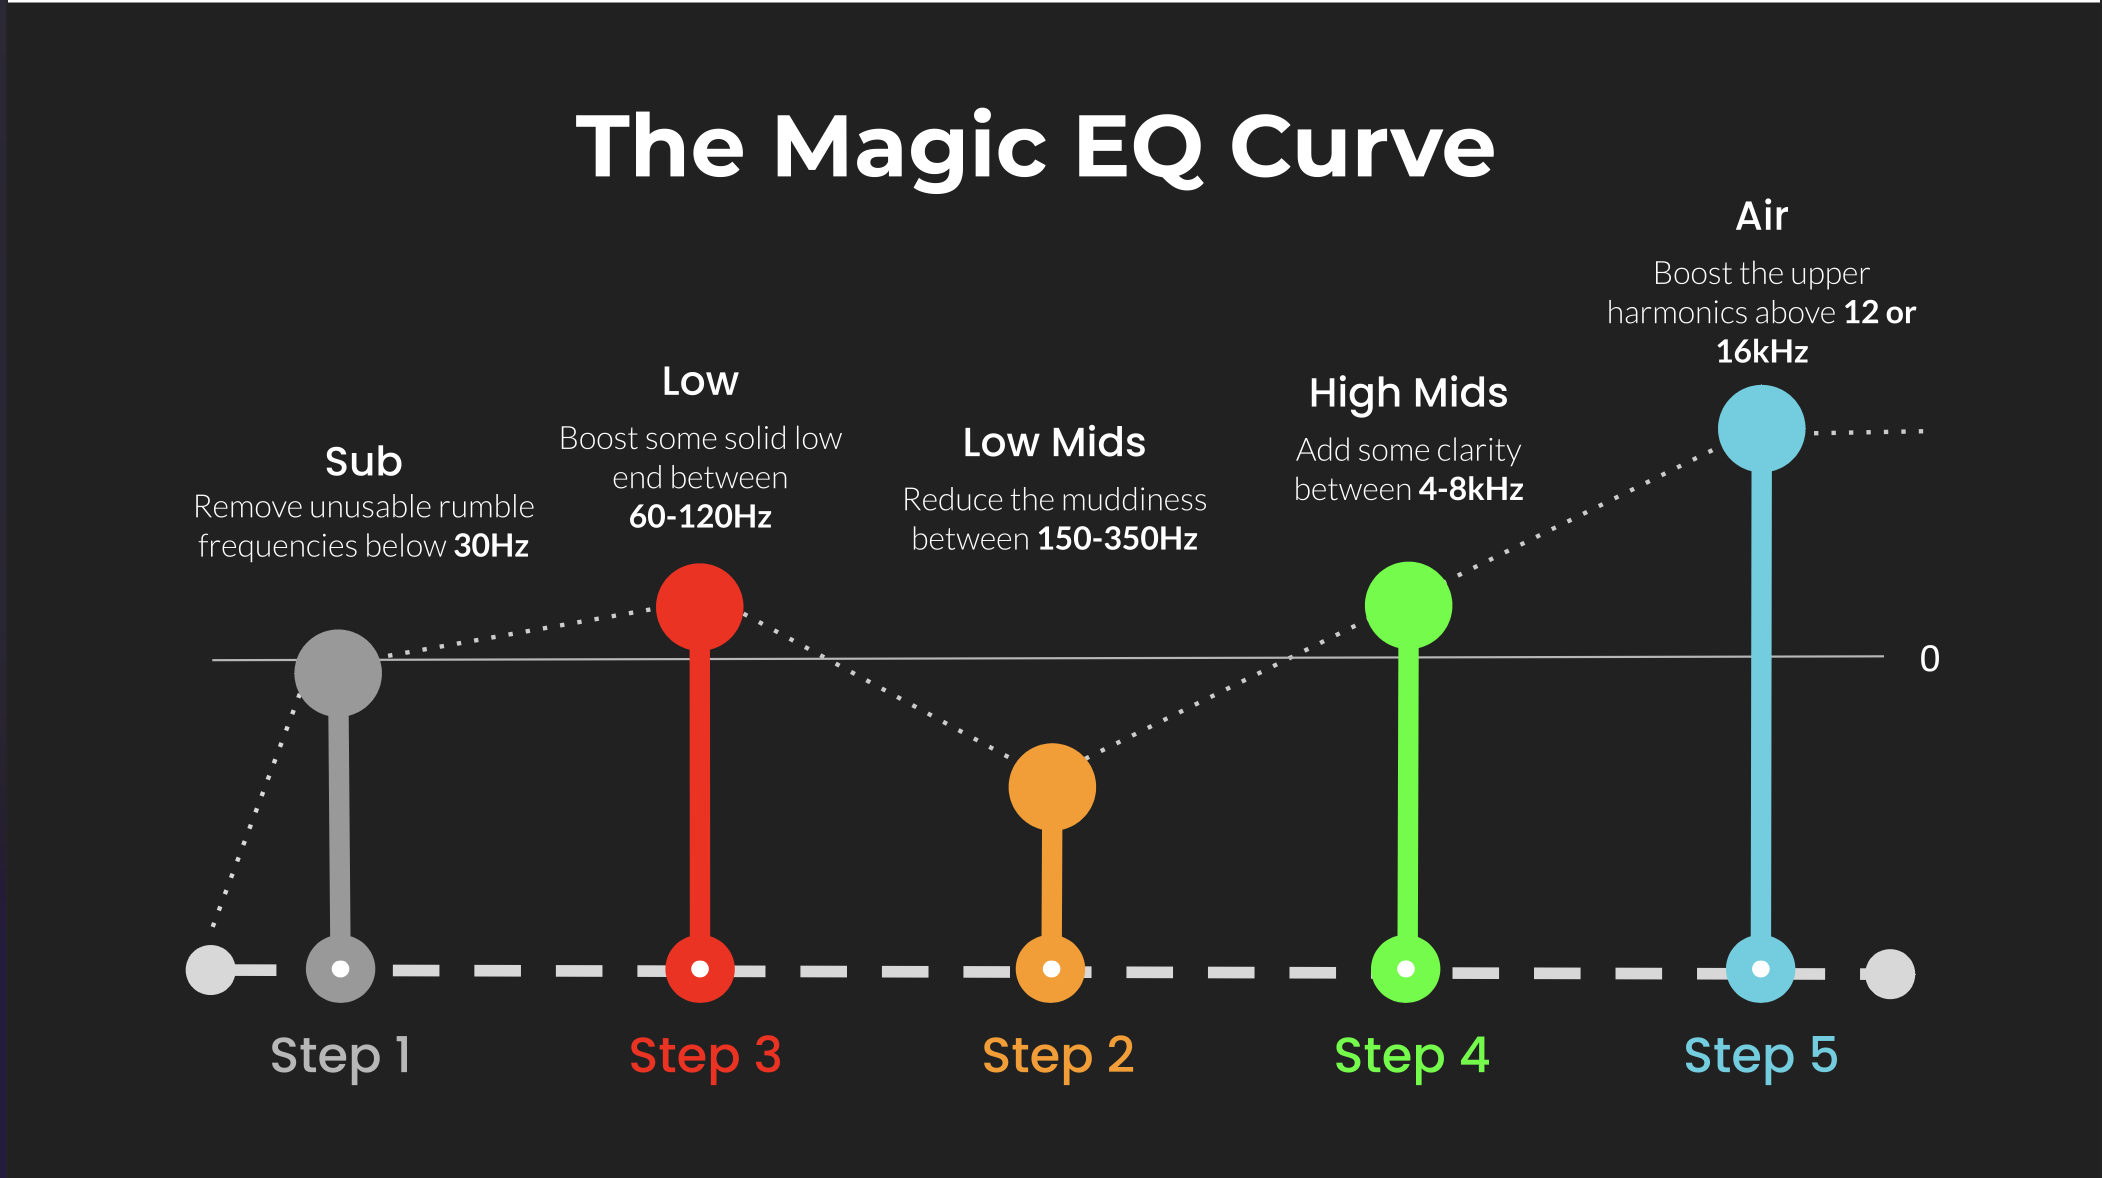 ⭐️ Download my Free Magic EQ settings Guide ⭐️

⭐️ Download my Free Magic Reverb settings Guide ⭐️
#protools #daw #homestudio #recordingschool #recording #musicproduction
Also read:
How to Start Your Own Online Business Teaching Music

Hey, I’m Futch – Music Production Coach and Ableton Certified Trainer

Learn how to make your first song and beat in Ableton Live with my
FREE 90-minute Ableton Live course
I’ve been teaching audio engineering and music production for 35 years.⭐️
Check out my new online music production program: Music Production Ninja…